Monday, November 14, 2011

Tile Progress!

After much preparation and anticipation, the tiling has finally begun!  Here are a couple “before and afters" from our efforts this past weekend.

Shower Before:


 After:


 Custom shower pan Before:

After:  (take note of the little seat Lee built - I'm going to have to focus a little more on portion control)  :)

And here are a couple of the corner shelves we put in. We had to tape them to the wall so they could set up:
I'll post some more pictures when it's complete! 

I love that from this point forward it’s all stuff that will actually add to the décor of the house…tile, hardwood floors, lighting, built-ins, etc.  It’s coming to life!


Thursday, November 3, 2011

Not As Planned

Frustration, sore arms, little patience, botched wall, stupid angles, wrong color, bad texture, neck issues.   Those are the first words that come to mind when I think about the last 5 days. 

This makes me think of an older lady that lives in our condo complex.  One day I saw her out in the parking lot and I asked her how she was doing.  She said "Do you ever have those days where you have your whole day planned out and you know exactly what you want to get done, but you quickly realize that God has a whole different plan for your day? ".  That really stuck with me.  I thought that was such a wonderful way of looking at it.  Not all days are going to go how YOU want them to, big woop.  Things happen.  Life goes on :)  

In this case, our weekend did not go as planned.  You all remember my last post, right?  I was all “tiling woohoo!! painting woohoo!!! Life is great, progress is being made, I can’t wait to inhale those paint fumes and see tiles on the wall.”  Ha!  That was until every single thing we set out to do that weekend went wrong.  I was in a pretty great mood until we were riding home from Sunday dinner and it hit me.  I turned to Lee in the car and said “Ya know?  All in all that was a pretty crappy weekend now that I think about it” (well, crappy wasn’t really the word I used, but for blog-sake we will leave it at that).  He kind of chuckled and asked me what I meant.  That’s when I broke it down for him….

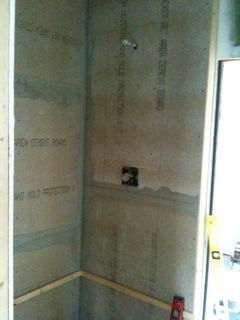
1)       It took him 5 hours to hang backer-board in ONE bathroom (all thanks to our weird angles, non-level walls and floors...and the fact that the concrete board stuff is a doozy to cut).


 Finished product:


2)      I painted the living room/dining room and it did not turn out the color that was on the swatch (whyyyyyyy are there so many options if they can't get it to match anyways?!)  However it is still a light neutral so I guess that's a plus, no sense in dwelling on it..


3)      I also started on our chalkboard wall in the kitchen.  I had the fantastic stupid idea of using something called Magnetic Primer on a big long strip across the wall. The point of that primer is that once you paint over it, that section of the wall is magnetic.  I was thinking we could hang Christmas cards, birthday cards, pictures, etc. across our chalkboard wall.  Well, turns out that stuff is a pretty thick texture (meaning once painted over, you could really see this section of primer since the texture is so thick).  While it seemed like a good idea, it just really wasn’t.   Flash forward to last night. Remember the “sore arms” bit I wrote in the first sentence of this post?  That is because I sanded every bit of that magnetic primer off the wall to try and smooth it all back out to where the big strip won’t be visible across the wall anymore.  I painted another coat of chalkboard paint over it, held my breath, crossed my fingers, did some kind of weird hopeful chalkboard dance, and then drove by this morning to check out the results.  Better.  Not perfect, but better.  Here’s to hoping another coat of paint will do the trick. 

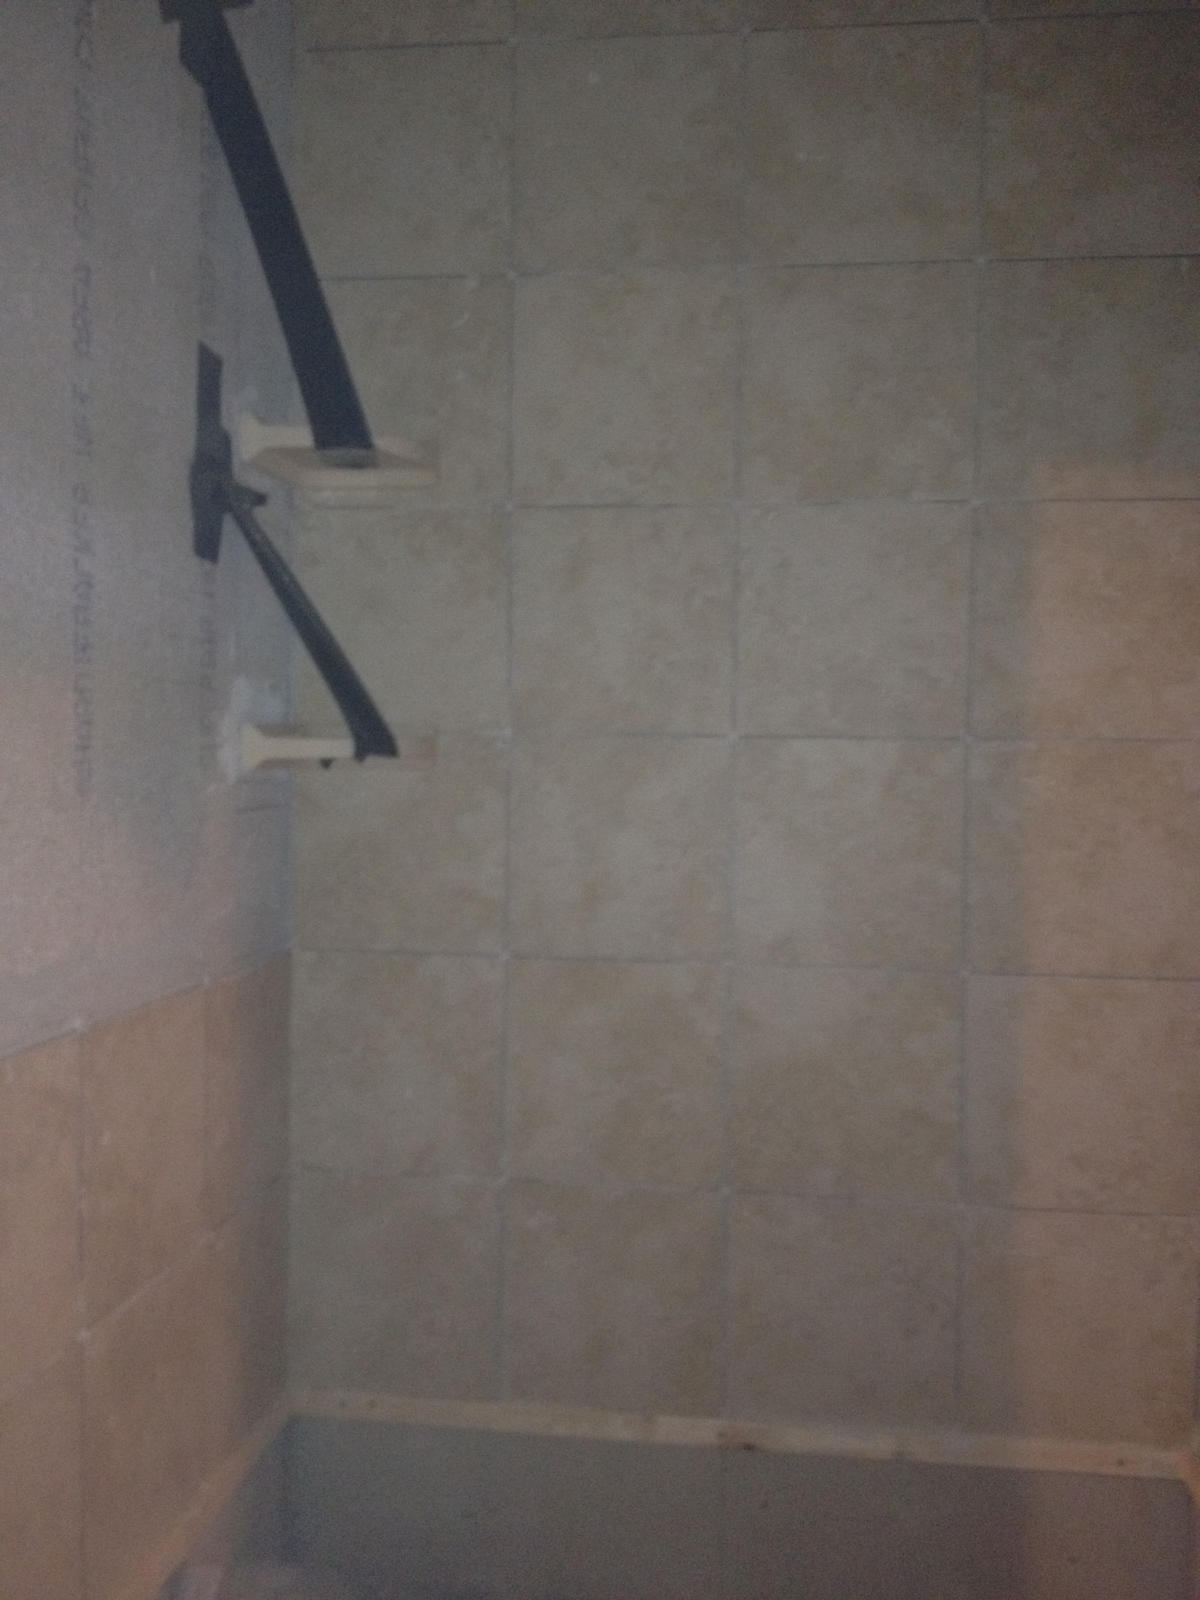
Before (this is the magnetic primer):


 After painted over with chalkboard paint. Can you see the line across the middle of the wall below?  It was even worse in person.

 Here's the line again:

 Sanding, sanding, and more sanding:

 Here it is with another coat of paint over all of the sanding. Better!! ALMOST unrecognizable.

 I still have a couple more things to do to work my magic, though.  Wish me luck!!

So in better news, the chalkboard wall seems to be on the mend, Lee finished our custom shower pan last night in our 2nd bathroom (!), and I will continue painting the rest of the house this weekend.   I don’t usually dwell on negative stuff, it was just funny to me that so much frustration went down in one weekend.  I think when we only have 2 solid days per week (at best) to work on projects, we just really hope for the best in getting things done in that short of a time frame. It's bound to happen that things go wrong or slower than we expect, we might as well laugh about it when things don't go as planned.

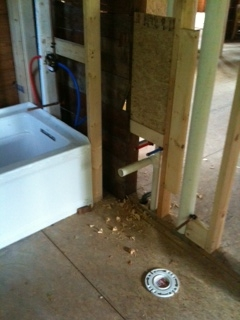
Here are some progress pictures of Lee’s custom shower pan.  This was quite the process, two layers of concrete, a moisture barrier between them, some kind of wire lathe, setting the slope correctly so that the water drains, etc.  I think Lee's pretty happy to have this behind him:


Now it's all set to be tiled, except we have to hang the backer board stuff in this shower too...I really hope it goes smoother than the main bath.  This bathroom is a lot more square, so let's hope. 

I can't wait to see how far we get this weekend! 

Thursday, October 27, 2011

Paint...Tomorrow!!

Tomorrow, I start painting while Lee starts tiling the bathroom.  I just used the words "painting" and "tiling" you guys.  We are so close!!! 

That means that Lee can finally stop going like this...


 When I come at him like this...


Wednesday, October 5, 2011

Insulation and Studs

Insulation
Tools Needed:

Your insulation of choice: 

 
A really sharp knife:
 
A really good stapler: 
 

A ladder: 


A really sexy husband: 


Okay, the last one is optional.


It's just an added bonus.


A really, really nice added bonus. 

 
Here are a few before/after pics just for fun...

 
Before:

   After:

 Before:

 After:

Insulated kitchen:

 Insulated ceiling:


Insulation is exciting and all, but I'm sick of looking at studs.

Studs...
 
Studs...
 
Stud...
 

...you get the point.  The good news is I don't have to look at those studs for much longer.  A really big truck delivered all of the drywall to our doorstep (literally...check out that arm that brought it right to our front door) yesterday:  
And they start installing the drywall TODAY!! 

I'm not sure how long it will take them to complete the job, but we will be hustling to paint the ceilings before the 18th...that is when our electrician will be back to hang all of our light fixtures, ceiling fans, etc.  Which means we will be able to light this place up!!   One step closer :)


Wednesday, September 14, 2011

Patio Door

You want to know something that feels kind of crazy?  Cutting a big hole in the side of your house. 


Last weekend we tackled the patio door off the dining room.  It feels amazing to open up that space and bring more of the backyard view into the house.  For now we will probably just put some steps in, but eventually that will be a walk-out onto a deck. 

Lee and Charlie worked on Saturday framing up the doorway:


There was a slight problem, though.  The frame they built to go in was level...the floor, not so much.  So, Sunday Lee and I headed over to straighten it out some. 

We took out the jack studs on the right side:


Bumped the header up about an inch:


Then put new jack studs back in...bada bing, bada boom. That part went relatively fast, it was cutting the actual hole in the side of the house that took some time.  We had to cut through the wall you see above, the original wood shakes that were on the side of the house, and the white aluminum siding that is there currently.  I learned all about the kind of blades needed for the circular saw depending on what kind of material you are cutting through.  I wouldn't say I'm quite to "Heidi" level (...Home Improvement, anyone?), but I'm getting there!

Here are some of the finished product:


It needs some patching, but at least it's in!  Now we can get on with the framing inspection...

Wednesday, August 31, 2011

What a week!

Last week is a blur, but in a good way.  We were all excited that the plumbing was roughed in, and literally in the blink of an eye so was the electric and HVAC.  Our electrician was trying to get our house done before two big jobs he has coming up, so he either had to get started ASAP, or wait a while.  Guess which option we chose?  We did have to scramble a bit to make sure we knew where we wanted light fixtures, light switches, outlets, etc (aside from what code regulates), since he literally wanted to start the work two days after we received his estimate.  It was well worth the scramble though since he was able to get the job done so quickly.

In the meantime Lee called Air Kings, our chosen HVAC contractors, to check back in with them about the quote they provided us with a while back.  Without speaking to them in months they said "we will be out there Wednesday."  Fantastic!  So basically within 2.5 weeks we went from having nothing roughed-in to having plumbing, electric and HVAC all in.  We were kind of just staring at each other with dumbfounded looks on our face all week like..."wow, okay, time to figure out who will be doing the drywall".  I don't think either of us expected to be at the drywall stage this quickly, but we won't complain a bit.  After that is done, it's back on us to finish everything.  Here's what's left on our to-do list. 

1. Install the patio doors off of the dining room (which we will be doing this weekend).
2. Insulate
3. Drywall.
4. Tile the bathrooms.
5. Lay/stain/finish the hardwood floor.
6. Put up trim.
7. Ride up to Ikea to pick out our kitchen cabinets.
8. Buy appliances.
9. Move in.

I'm sure I'm missing a few things here and there, but that's pretty much the gist of it.  Our bedroom closets will be built-ins, half of our dining room will be built-in's (two cabinets with a bench in the middle).  We need to replace a couple windows, we will need to paint, etc. But overall we feel like the end is somewhat in sight.  We keep saying "Christmas" when people ask us when we might be in, only becaue it seems far enough away to be realistic...but who knows.  Either way we are pleased with the progress and are excited for these final stages.

Here are a few pictures of things that have been going in.  I don't expect these pictures to excite anyone, but they sure make me smile!  Here's what else is going on behind our walls...

Looking up at the ceiling (electrical wires, air ducts, plumbing drains):

 Not sure why this picture turned out sideways, but those are some of our canned lights in the kitchen:

 Heating/cooling duct work:

 Wire hanging out everywhere, mid-job:

 This is what our wall outlets look like these days:

And our light switches:

Once the drywall is put on the electrician will come out to finish all of the outlets and light switches and hang all of our fixtures! 


Wednesday, August 10, 2011

Plumbing...what's really going on behind your walls.


Something that I really enjoy about this whole process is knowing what's going on under my house, and behind the walls.  Normally I would never think twice about that stuff.  Do we have water? Great.  Do we have lights?  Awesome.  Never mind what's actually making those things possible.  But now, nooooow, I love knowing. 

The plumbers started working last Thursday, did a little on Friday, a lot on Monday, and then finished up today.  I guess the inspector stopped by at some point this morning, and all was approved.  In case you are dying to know what roughed-in plumbing looks like, here you go:

 Blue = cold water pipes       Red = hot water pipes

 If you follow these pipes up to the attic, you find the water heater!  Can you see it?  It's kind of dark...

 The best thing about that is, you will not find it actually sitting in one of our bathrooms like it was when we bought the house: 
 In fact, that bathroom is looking much different these days:
 You can see where the doorway used to be, right?  We decided to wall over that doorway and move the new doorway around the corner (to the left). We weren't really digging the idea of being able to see the toilet from the living room, kitchen and dining room if the bathroom door is left open. So, in switching the doorway over to the side, you won't be able to see inside the bathroom at all...which is much better!

Here we have the tub, again you will see the hot and cold water lines, and if you look really close you might even see the copper line running up to where the shower head will be...

Hookups for sink and toilet...

Hookups for washer and dryer:

Drains for bathroom #2:

 Water pipes and drain for the stand-up shower in bathroom #2:

And finally, my favorite part of it all...the water spicket on the front of the house: 

We will be celebrating this weekend by washing our cars, since hooking up a hose is just about the only way we can actually use this water until it's time to put all of the fixtures in!

We will be appliance shopping in about two weeks, which will be quickly followed by all of the electric going in!!  That will be Edition #2 of "What's Going On Behind Your Walls"!  :)